System mode or God mode in Apex – Gotchas

Gotchas of System mode or God mode in Apex and its impact by using “With sharing” keyword in Salesforce.

There is no specific Salesforce documentation which can explain that what is allowed or not allowed in System mode.

Before diving more lets discuss how many types of mode do we have in Apex ?

User Mode : As per this Salesforce post, all Profile level permissions, sharing rules and Field level security are enforced in Apex if it runs in User mode. Standard Controller and Anonymous Apex runs in User mode.

System Mode : Same post conforms that custom controller, trigger, Apex class, controller extension works in System mode. Means eventhough user does not have necessary profile level permission, record level permission or field level permission, but still they can perform any operation on it.

Creating test scenario

For testing purpose, I am going to use a user with “Chatter free” license and existing Opportunity record. Consider OWD for opportunity is “private”.

Apex class :

In this class, I am trying to update existing Opportunity

public class  SystemMode_Scenario {
    public static void perform(){
        Opportunity Opp = [SELECT NAME,StageName FROM Opportunity WHERE Id = '006K000000CD1fZIAT'] ;
        Opp.StageName = 'Negotiation/Review' ;
        update Opp;
    }
}

Trigger on Feeditem :

Whenever chatter free user is posting any chatter comment, below trigger should run and execute method in Apex class

trigger updateOpportunityFromChatterComment on FeedItem  (before insert) {
    SystemMode_Scenario.perform();
}

Chatter free user trying to update Standard Opportunity record – God mode in Action

As we know, Chatter free user cannot access any standard or custom objects. so as per documentation there is no way chatter user can access or update existing Opportunity.

However, if you try to add comment in chatter using chatter user, trigger will be able to update existing Opportunity eventhough user does not has CRUD permission at profile level. So, we can say Apex really works in GOD mode.

When Apex does not work in System or God mode – Gode mode failing because of “with sharing” keyword

Example 1 :

Update Apex class with below code, only difference you can spot is addition of “with sharing” keyword.

public with sharing class  SystemMode_Scenario {
    public static void perform(){
        Opportunity Opp = [SELECT NAME,StageName FROM Opportunity WHERE Id = '006K000000CD1fZIAT'] ;
        Opp.StageName = 'Negotiation/Review' ;
        update Opp;
    }
}

Example 2:

In this example, lets try to create new record for Lead object and therefore update Apex class with below code :

public with sharing class  SystemMode_Scenario {
    public static void perform(){
        Lead l = new Lead(LastName='Zaa',Company='Cognizant');
        insert l;
    }
}

In previous example, we have seen that Apex class failed because of “with sharing” keyword and it makes sense because chatter does not has record level permission.

In this example, we are not trying to access any existing record rather creating a new lead record. “with sharing” keyword only checks if user has access to existing record or not and therfore this code should work if Apex works in God mode.

However, code will still fail with below error saying “Invalid User Type”.


Salesforce God Mode failing

My two cents – Should we use System mode or rather I will say abuse God mode ?

So, there is way to get out of licensing cost. Consultants or developers may think that we can buy low cost license and using custom Apex and visualforce, same functionality can be achieved. However, I would not suggest because of below two reasons :

  1. Salesforce documentation clearly segregates capabilities of difference licenses and they can change System mode functionality anytime. In fact, they have already started it by introducing “with sharing” keyword.
  2. You’re violating the Master Service Agreement and/or related agreements. You could be charged for full licenses retroactively, and failure to pay is breach of contract that will result in a lawsuit for damages, plus the loss of data that could result.

I would suggest to go through this article of Abhinav as well, which also explains similar to what I am trying to explain here.

If any information here are not correct or you have different experience, please share in comment. I would try to update this post with your feedback.


Automated Code review for Apex in Salesforce – Static code analysis

PMD is very well known source code analyzer for Java, android and many more languages. Good news for us (Salesforce developers) is , that it supports now Apex. You might be thinking how can we make PMD as part of our daily life ?

There are multiple ways

  1. We can run static code analysis standalone
  2. It can be part of ANT build to generate error reports
  3. Jenkins can use it to generate nice report around code quality
  4. Eclipse can use it as a plugin to generate report

In this blog post, we will discuss option 1, that is running it as a standalone application to generate code quality report.

First Step is to download jar file of latest PMD distribution from here.

Next step is to define some rules for your code base. Sample rules can be seen here. We can also create our own rule as per need. For this blog post, I would be using below rules.

Apex Rules.xml

<?xml version="1.0"?>
<ruleset name="Apex Rules" xmlns="http://pmd.sourceforge.net/ruleset/2.0.0" xmlns:xsi="http://www.w3.org/2001/XMLSchema-instance" xsi:schemaLocation="http://pmd.sourceforge.net/ruleset/2.0.0 http://pmd.sourceforge.net/ruleset_2_0_0.xsd">
	 
	<rule name="AvoidDeeplyNestedIfStmts" message="Avoid creating deeply nested if-then statements since they are harder to read and error-prone to maintain." class="net.sourceforge.pmd.lang.apex.rule.complexity.AvoidDeeplyNestedIfStmtsRule">
      <description>
      Avoid creating deeply nested if-then statements since they are harder to read and error-prone to maintain.
      </description>
        <priority>3</priority> 
      <example>
		<![CDATA[ public class Foo { public void bar(Integer x, Integer y, Integer z) { if (x>y) {
						if (y>z) {
							if (z==x) {
								// !! too deep
							}
						}
					}
				}
			}
		]]>
      </example>
    </rule>
	
	<rule name="ExcessiveParameterList" message="Methods with numerous parameters are a challenge to maintain, especially if most of them share the same datatype. These situations usually denote the need for new objects to wrap the numerous parameters." class="net.sourceforge.pmd.lang.apex.rule.complexity.ExcessiveParameterListRule">
      <description>
      Methods with numerous parameters are a challenge to maintain, especially if most of them share the same datatype. These situations usually denote the need for new objects to wrap the numerous parameters.
      </description>
        <priority>3</priority> 
      <example>
		<![CDATA[ 
// too many arguments liable to be mixed up 
public void addPerson(int birthYear, int birthMonth, int birthDate, int height, int weight, int ssn) 
{ ... } 

// preferred approach public void addPerson(Date birthdate, BodyMeasurements measurements, int ssn) 
{ ... } 
]]>
      </example>
    </rule>
	
	 <rule name="ExcessiveClassLength" message="Excessive class file lengths are usually indications that the class may be burdened with excessive responsibilities that could be provided by external classes or functions. In breaking these methods apart the code becomes more managable and ripe for reuse." class="net.sourceforge.pmd.lang.apex.rule.complexity.ExcessiveClassLengthRule">
      <description>
      Excessive class file lengths are usually indications that the class may be burdened with excessive responsibilities that could be provided by external classes or functions. In breaking these methods apart the code becomes more managable and ripe for reuse.
      </description>
        <priority>3</priority> 
      <example>
		<![CDATA[ 
public class Foo { public void bar(Integer x, Integer y, Integer z) { if (x>y) {
						if (y>z) {
							if (z==x) {
								// !! too deep
							}
						}
					}
				}
			}
		]]>
      </example>
    </rule>
	
	<rule name="NcssMethodCount" message="This rule uses the NCSS (Non-Commenting Source Statements) algorithm to determine the number of lines of code for a given method. NCSS ignores comments, and counts actual statements. Using this algorithm, lines of code that are split are counted as one." class="net.sourceforge.pmd.lang.apex.rule.complexity.NcssMethodCountRule">
      <description>
      This rule uses the NCSS (Non-Commenting Source Statements) algorithm to determine the number of lines of code for a given method. NCSS ignores comments, and counts actual statements. Using this algorithm, lines of code that are split are counted as one.
      </description>
        <priority>3</priority> 
      <example>
		<![CDATA[ 
public class Foo extends Bar 
{ 
//this method only has 1 NCSS lines 
public Integer methd() { 
super.methd(); 
return 1; 
} } 
]]>
      </example>
    </rule> 
</ruleset>

In above sample rule file, if we observe carefully, each rule is represented by rule tag. we can give it any name and then message to be displayed in report. class represents respective rule written in Java class by PMD and this information would be available here.

priority can set level of violations and this would differ as per your project. We can categorize level of violations for each rule and it helps us in reporting code quality of developer team.

Final step is to run below command from shell / command prompt. This documentation will help to understand all parameters needed to run PMD from command prompt.

Following image shows sample command run

Sample command to run PMD from console

Below is sample code quality report generated

Apex code quality report

Youtube video

Continuous Integration (CI) in Salesforce using Team Foundation Server (TFS) – Video

Step by step guide to set up Continuous Integration (CI) for Salesforce using Team Foundation Server (TFS) with video tutorial

We can either use cloud based Team foundation Server (TFS) or locally installed on network. For ease, we would be using cloud based TFS for this blog post.

Step 1: Creating developer account on VisualStudio Online

Navigate to https://www.visualstudio.com/ and choose Get Started for free in Visual Studio Team Services section. You may need to create a new Microsoft developer account, if you don’t have it already.

Step 2: Using TFS as source code repository

Once we are able to login to TFS, lets start by creating a code repository. That’s right, you don’t need separate Bitbucket or Github account to save your code/metadata unlike in Jenkins. So, our start with TFS is really good and impressive till this point 🙂 
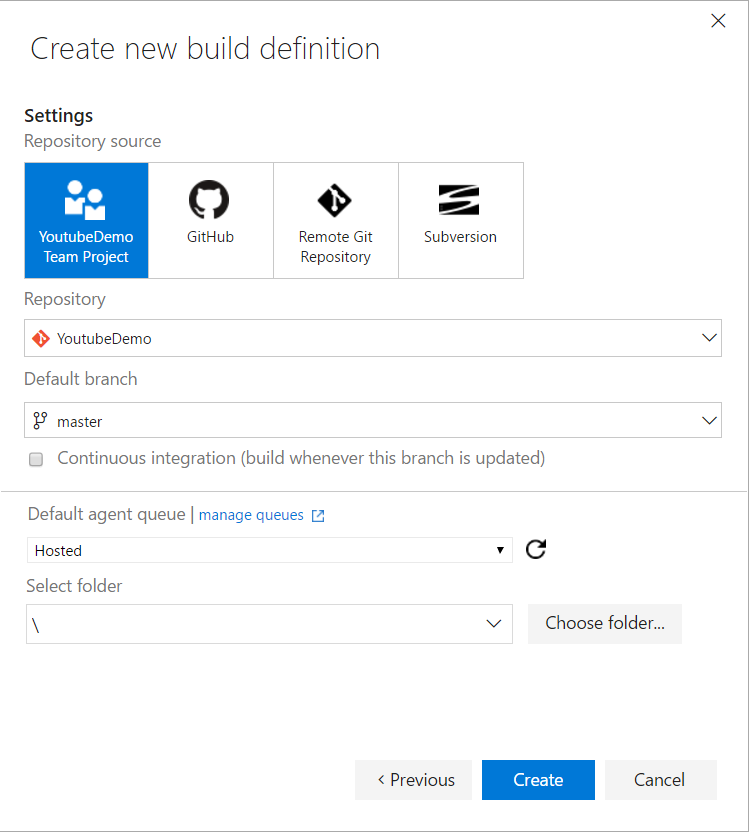
. Wizard to create new project is self explanatory and would look like below image

Visual Studio Team Foundation Server - New Project Screen
Visual Studio Team Foundation Server – New Project Screen

Once new Project is created in Team Foundation Server, we can use any git client, like tortoise git to save code. For authentication purpose, we can either use normal username password flow or generate SSH key and use that key for authentication. This youtube video or blog post will help you to generate SSH key, if its something new to you. Once key is generated, we would need to save it on TFS so that it can validate authenticity of user.

If you think you are little bit lost here, don’t worry :). I have posted video as well at the end of this blog post, showcasing everything in detail.

Step 3 : Create & test ANT deployment script on local system

If you have visited this article, chances are high that you are well aware about ANT script to deploy metadata into Salesforce. If not, no worries, I got you covered here as well. This blog post will serve a purpose of guide and key to fantasy world of ANT migration toolkit.

Lets create a build.properties file, which will have all of your credentials and important information about deployment

build.properties

1 # build.properties
2 sfSandbox.serverurl = https://test.salesforce.com
3 sfPRO.serverurl = https://login.salesforce.com
4
5 sfdc.cb.df14.username=Salesforceusername
6 sfdc.cb.df14.password=Salesforcepassword
7 sfdc.cb.df14.retrieveTarget=src
8 sfdc.cb.df14.unpackaged=src\\package.xml
9 sfdc.cb.df14.retrieveMessage = Script to retrieve metadata from Salesforce
10
11 sfdc.cb.df15.username=Salesforceusername
12 sfdc.cb.df15.password=Salesforcepassword
13 sfdc.cb.df15.retrieveTarget=src
14 sfdc.cb.df15.unpackaged=src\\package.xml
15 sfdc.cb.df15.retrieveMessage = Script to retrieve metadata from Salesforce
16
17
18 sfdcJarFile=ant-salesforce.jar

build.xml

1 <project name="Deployment Scripts" default="deploy" basedir="." xmlns:sf="antlib:com.salesforce">
2        
3     <property file="build.properties"/> 
4     
5     <target name="df14"
6     <taskdef resource="com/salesforce/antlib.xml" uri="antlib:com.salesforce"classpath="${sfdcJarFile}"/>
7                 
8         <echo message="${sfdc.cb.df14.username}"/>
9         <sf:retrieve username="${sfdc.cb.df14.username}" password="${sfdc.cb.df14.password}"serverurl="${sfPRO.serverurl}" retrieveTarget="${sfdc.cb.df14.retrieveTarget}"unpackaged="${sfdc.cb.df14.unpackaged}" />
10     </target
11     
12     <target name="deploy">
13     <taskdef resource="com/salesforce/antlib.xml" uri="antlib:com.salesforce"classpath="${sfdcJarFile}"/>
14                 
15         <sf:deploy username="${sfdc.cb.df15.username}" password="${sfdc.cb.df15.password}"serverurl="${sfPRO.serverurl}" deployRoot="src" maxPoll="1000" testLevel="NoTestRun" checkOnly="false"pollWaitMillis="10000" rollbackOnError="true"/>
16     </target>
17     
18 </project>

Important difference to notice above is that how Salesforce jar is referred. In some situations where we have access to system, we simply put address of jar file of Salesforce migration toolkit in classpath. However in this scenario, as we are using cloud based solution for Continuous Integration, we need to refer jar file location relative to code base. Therefore while pushing build.properties and build.xml as a code in git, we would need to push ant-salesforce.jar file as well.

Once all above settings are in place, try to run command

ANT df14 deploy

Target df14 will retrieve source code from one Salesforce instance and would deploy same code to df15 instance in our example.

Step 4 : New Build definition in Team Foundation Server

In this step, we will create New build definition informing TFS which ANT target to invoke.

Navigate to Build & Release | New definition | Build | Ant

In next screen, we would need to select repository. It has few options like Github, some remote Git repository or SVN. As we have already created Git project in TFS itself, we have selected that. Next option we have is to choose a Git branch. It is possible that we need nightly build on one branch and hourly build on some other code base branch. So to address these kind of situation, we can have multiple builds in same project with different branches.

Team Foundation Server (TFS) - New Build definition - Select repository
Team Foundation Server (TFS) – New Build definition – Select repository

Next screen would be to add build steps of ANT. In our example, we have already specified default target however you can add ANT target depending on requirements. Once we save below screen, we are all set to test our Continuous Integration project using Microsoft’s Team Foundation Server.

Team Foundation Server (TFS) - New Build definition - add build steps
Team Foundation Server (TFS) – New Build definition – add build steps

Below video explains everything we discussed in this post. Please don’t forget to drop your feedback on this post.

How can I remove the Chatter component from the Home tab?

  • Create a new HTML Page Component
  • Create the wide version
  • Click show HTML
  • Paste the following in:     <style>.bPageTitle .metadata { display:none; }</style>
  • Add it too the Home page layout

Chatter is no more on the homepage… Essentially what its doing is hiding the html code that the chatter resides in. So its still on the page just hidden on the browser…  I only quickly did it so please test to make sure its all ok and doesn’t effect anything else on the page.


Its actually a nice little trick because you can also add the HTML to the left nav and essentially do the same thing for anything in Salesforce but the left nav needs a bit more testing.

Connect Offline Issues.

Hi,

There are so many posts where people posted their issues in getting connected to salesforce connect offline.

Connect offline is one of the best practices where the sales team can have the maximum benefit with the application to work offline where they have no access to office network. The tool helps extracting all the related opportunities and cases pulled to the briefcase and hence the individual can access them and edit them when ever required.

steps to get connected to Connect offline.

1. loggin to salesforce and select your name-setup.

2. go to the navigation pane and select force.com connect offline.

3. Download the exe.file and run the file with the administration setup.

4. Double click the offline edition to see the login form page.

5. go to your org and generate security token from your personal information link by clicking on ‘reset my security token’.

5. select offline briefcase configuration link on the navigation page.

6. name your briefcase and select the objects you need to extract to the briefcase.

7. save your briefcase.

8. come to the offline edition login page.

9. enter the username and enter your password followed by the security token.

10. make sure the offline line edition access is enabled on your profile setup.

11. select the check boxes and login to the offline edition.


Blog at WordPress.com.

Up ↑